|
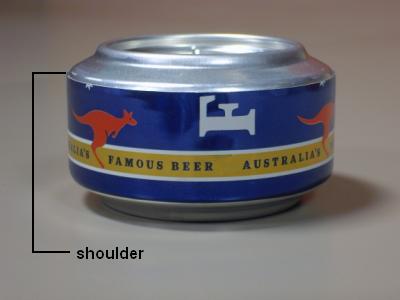
1. My method is to insert a shorter, upper, inner part into a full-height lower, outer part, and let the two
parts guide the placement of the inner wall, and then to remove the dimple of the upper can.The strong shoulder of the upper can forms an interference fit with the wall of the lower can.This results in a burner that is as strong as the original can, requires no glue, and has a full-height fuel cup to eliminate potential leaks. |
|
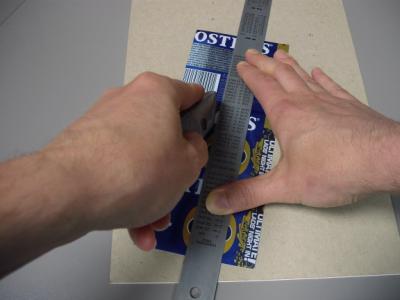
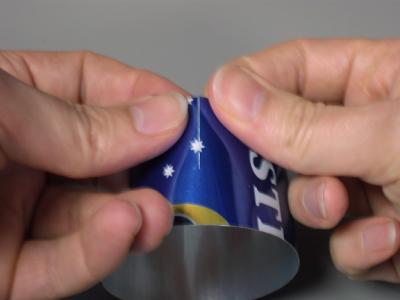
2. Start with two identical aluminium cans. The pressed rings of the bases, and the shoulders of
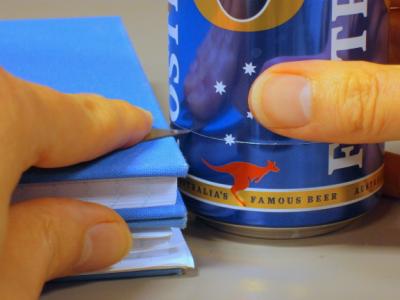
the cans must be free from dents.Take a Stanley knife blade, place it firmly on hardback book* which is as thick as you want the can section to be high (about 30mm or 1 1/4″), and rotate the first can against the tip of the blade until you’ve scored all the way around the can.Make sure you support the can firmly and flat against the work surface, and keep the blade pressed firmly against the book; this will ensure an even score line.* or cutting board, or similar firm and parallel-surfaced item. |
|
3. Press the tip of the blade into the can by about 1/2″ to start the cut. |
| |
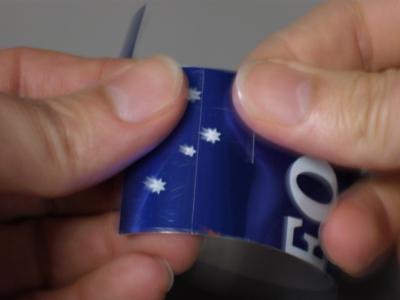
4. Flip the can over and score and puncture the top half, in preparation for making the inner wall. |
| |
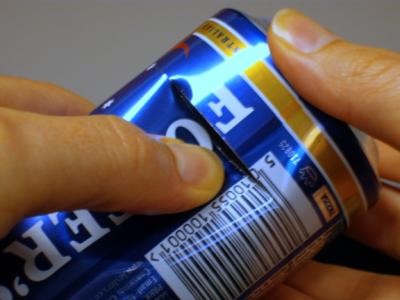
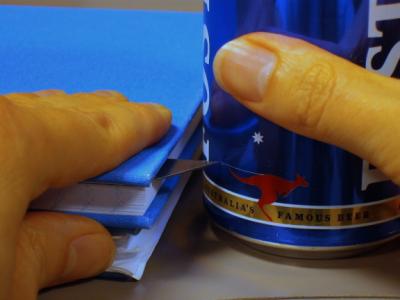
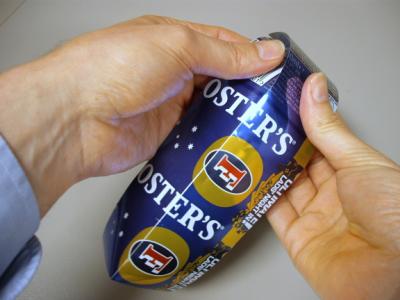
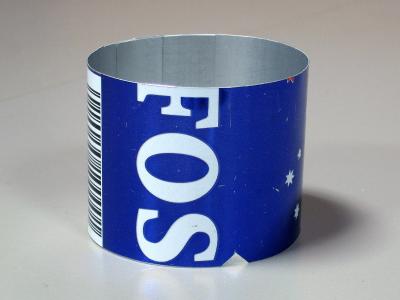
5. Remove the base by using your thumbnail to make the can tear along the scoreline, starting from the cut. Don’t take the top off yet. |
| |
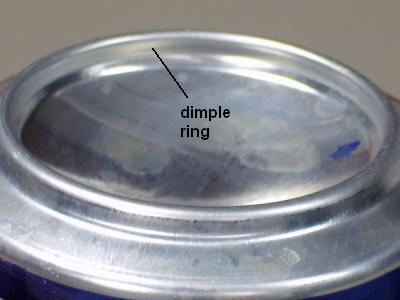
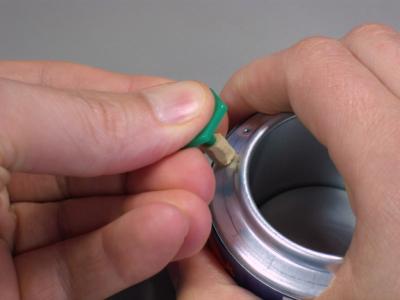
6. Take the second can and locate the ring of the pressed dimple that we’ll remove later. Whilst can
designs vary, there’s usually a distinct corner between the wall of the pressed ring, and the curved bowl of the dimple.In the picture, you can just make out two corner features between the
dimple and the wall of the pressed ring; we will use the feature nearer the pressed ring (the upper corner feature in the photo).We’ll use the inner wall of the pressed ring to hold the inner wall of the burner in place. |
| |
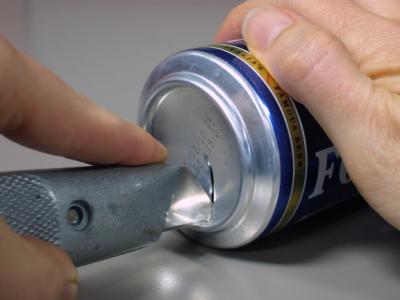
7. Make four (or more) cuts from near the centre of the dimple to the dimple ring (this will allow air
to escape as we mate the two halves, and prepare for the later removal of the dimple).Try to cut as close to the ring as you can, but take care not to cut
beyond the ring. |
| |
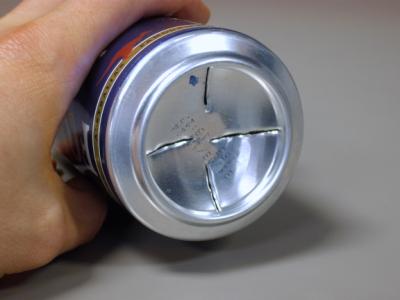
8. Four cuts completed.
We leave the centre uncut to retain the strength of the can until the two halves have been mated. |
| |
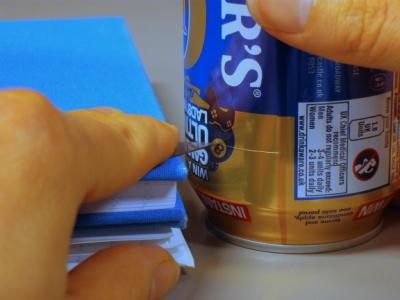
9. Using the same measuring book, insert the Stanley blade between the pages, so that it is about 3mm (1/8″) below the cover*. We need the inner can to be slightly shorter than the outer can to allow the burner halves to mate properly. Score and puncture the base of the can. Flip the can over and score and puncture the top half. Remove the base and top from the can, using the thumbnail tearing
technique.* Alternatively, rest the can you’re going to cut on another book that’s 3mm thick. |
| |
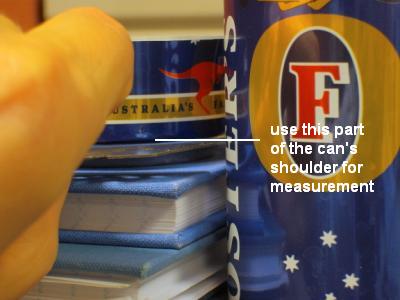
10. Now to make the inner wall.
Take one of the can bases, and place it upright on the measurement book.
Place the upper part of the first can alongside the book and can base, and make a mark on the can wall at the point on the cut base where the shoulder of the pressed can base starts to roll into the side wall.
Alternatively, find something about 6mm (1/4″) high to raise the blade off the book (3mm for 250ml ‘red bull’ cans). Or even use a ruler to
measure and mark the height… |
| |
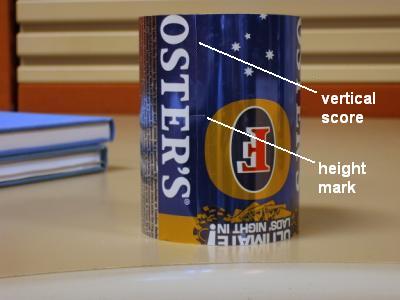
11. Score vertically up the side of the can through the height mark (so that the mark appears on both
edges) and then remove the top of the can by tearing along the score (as for the base). |
| |
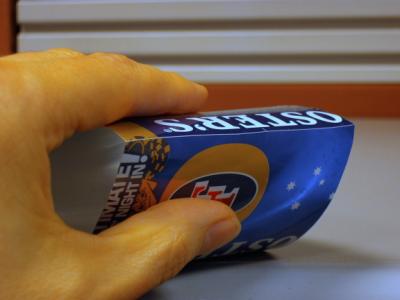
12. Gently fold along the vertical score to break the side wall open. |
| |
13. Open out the side wall and score with a straight edge aligned on the scored height marks at each end.You don’t need to apply a lot of pressure to cut the wall; just enough to score it. |
| |
14. Fold & snap along the scoreline to complete the cut. |
| |
15. Roll the side wall up and insert into the pressed ring of one of the cans.Close up the strip so that it forms a snug fit with the inner edge of the pressed dimple ring. When the burner is assembled, the inner wall will sit between the pressed rings of the two halves of the burner.Make sure that the wall is pressed firmly into the base, and that the two edges of the wall are at the same height (this ensures the wall des are parallel).Pick a point in the middle of the overlap and make a mark on both sides of the wall strip. In the picture, I’m using a knife to make a tiny nick in the edge of both overlapped sides of the wall. |
| |
16. Unroll the side wall and use a set square to score a line a fraction over half way across the strip at each mark. If you don’t have a set square to hand, you can usually get it square enough by eye, as it’s not that critical.Score from the ‘top’ of the strip at one end of the strip, and at the ‘bottom’ of the strip at the other end. |
| |
17. Gently bend and snap along the score line to open two slots. Don’t bend the strip beyond the cut. |
| |
18. Use the score, fold and snap method to trim the ends of the strip to about 12mm (1/2″) outside the
slots. |
| |
19. Cut three little fuel ports around the base of the ring; they don’t need to be very big at all; 3mm
(1/8″) is fine.Make one port half-way between the slots, and then one each at 2/3 of the way between the centre and each slot, either side of the centre.
Precise measurement isn’t necessary.Make a short vertical score, and then add angled scores from can edge to tip of the first score, making two little triangles.Use a thumbnail to break the scores and remove the triangles.Note the slots on opposite sides of the wall at either end. |
| |
20. Mate the two slots, with the ends facing the inside of the ring.You may need to ensure that the slots are fully broken out to make the ends of the ring join up properly. |
| |
21. The inner wall is finished.
The ring should sit flat, with no part standing proud. There should be no height difference between the two sides of the joint. |
| |
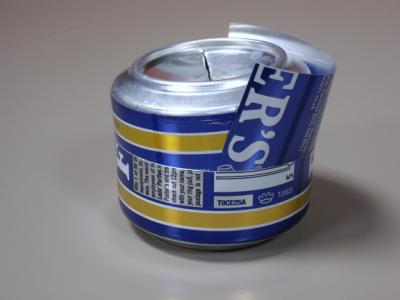
22. Now we need to expand the lower can to allow us to mate the two halves.Take a full can and press it in to the lower can by about 6mm (1/4″), to open up the lower can. If you allow the light to play down the side of the can, you should just about be able to see a step where the side wall has been widened. A full can isn’t essential, but it means that it won’t crush when you come to separate the cans. |
| |
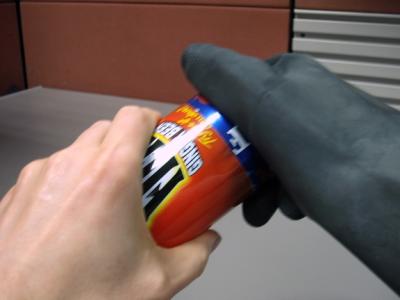
23. Twist the can base to remove it from the full can.You might have to wear rubber gloves to pull the cans apart, in order to get a good grip. Be careful not to crush the base as you remove it;
hold it by the shoulder of the can as much as possible. |
| |
24. Now to mate the parts, for which we need a shim or ‘shoehorn’.Cut a section of sidewall from the second scrap can and cut it in half.Cut a rounded edge along one ‘horizontal’ edge. |
| |
25. Place the inner wall in the lower can, ensuring that the fuel ports are at the bottom.Insert the shim into one side of the lower can, angle the upper can
slightly and insert one edge of the upper can into the lower can, with the other side on the shim. |
| |
26. Now carefully press the shim side of the upper can down until the cans are parallel, ensuring that
the edges of the upper can remain inside the lower can.I cradle the cans in cupped fingers, and use both thumbs, one on either side of the can, pressing on the shim side of the upper can. |
| |
27. When the upper can is within the lower can, and they’re roughly parallel, carefully slide the shim out,
holding the upper and lower cans in place.I hold the cans in one hand, with a thumb in the dimple, and use the other hand to gently slide the shim out.You may need to push the cans together again as you remove the shim. |
| |
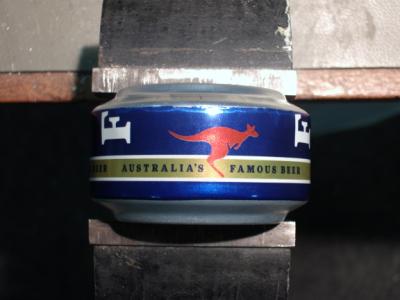
28. Carefully press the two cans together.This can be done by hand, but a vice, workmate or benchpress can help to provide a parallel, controlled pressure, but be careful not to press too hard and crush the inner wall. |
| |
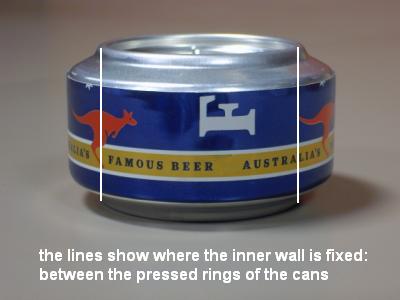
29. Complete the insertion, pressing the cans together until the outer can reaches the shoulder of the inner can, or you feel the resistance of the inner wall meeting the two halves.The inner wall ends up held securely between the pressed rings of the
upper and lower burner halves. Leaving both dimples in place during assembly means that they automatically guide the inner wall into place. |
| |
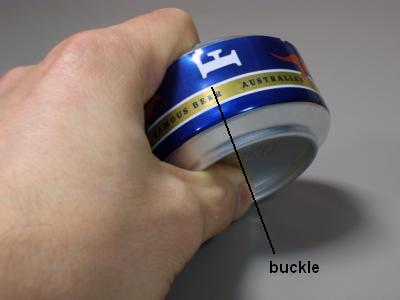
30. You will usually find that the side wall of the inner can has buckled in one place in order to squeeze into the lower can. You may even hear the can ‘pop’ as this happens. |
| |
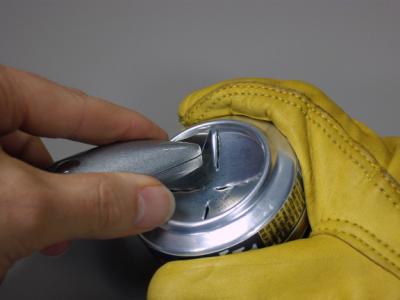
31. The dimple of the upper can is removed using the scoring method, but, due to the thicker metal, and the curved edge, it’s a little more difficult.Look for the distinct corner between the pressed ring of the base, and the curved bowl of the dimple, that we identified in step 6. This is where the dimple should be scored.Place the tip of the craft knife blade into the corner between pressed ring and dimple, and score gently and repeatedly around this feature.The shape of the dimple wall should help keep the knife true, and you can also rest the handle of the knife on the pressed ring of the can base to help guide it as you rotate the burner against the knife. Be
patient and don’t press too hard.Keep your fingers out of the way of the knife; a thick leather glove
might be worn on the hand holding the can. |
| |
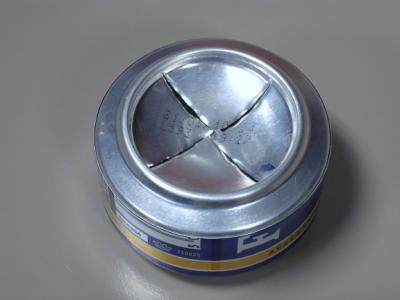
32. Once you have established a good score line, use the knife to extend the four cuts we made earlier to the centre of the dimple, separating all the segments.Take care not to point the knife into the side wall as you cut from the score line, and that you don’t press the knife in so far that it cuts
the lower can. |
| |
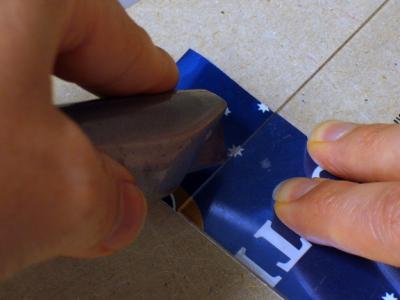
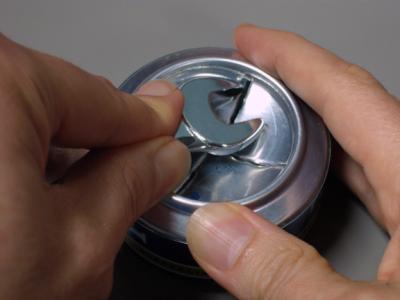
33. Since we can’t risk inserting a knife into the scoreline, due to the possibility of damaging the inner wall, we must use a tearing method instead. Use a rounded tool (e.g. a spoon handle) to start the tear along the scoreline, starting on one side of one of the four cuts. Rest the tool on the pressed ring of the can and use a levering action until the
metal starts to tear along the scoreline. Control the tool so that it does not press the dimple into the opening too far, or it might damage the inner wall.Once the tear has started, prise up the tip of the segment at the centre of the dimple, and use it to wiggle the segment up and down until the score fractures, and the segment pops free. Again, patience, rather than brute force, is required.Repeat for the other three quadrants. |
| |
34. Clean up the edges of the opening by scraping the edge of the knife blade along the edge of the
cut, taking care not to damage the inner wall.If your scoring and tearing was done cleanly, the edge may not need much attention.The upper edge of the outer can sometimes has a sharp edge where it has
been scored. This can be softened (deburred) by running a rounded tool around the edge. The handle of the spanner, or the shaft of a screwdriver, or similar, will do the trick. |
| |
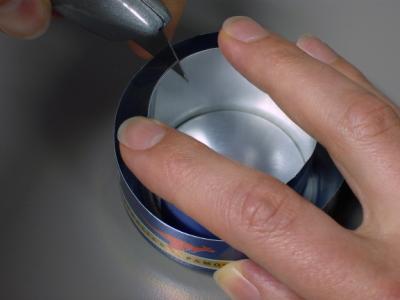
35. All that’s left is to prick or drill the jet holes, wherever you wish them to be.Take care not to over-insert the tool and puncture or damage the inner wall. A stop can be added to the tool, in this case, a piece of plastic cork on a map pin.The number and size of holes is the subject of huge debate. I find 16 holes each 0.8mm (1/32″) seems to work well for this burner. |
| |
36. Mark the jet positions with a strip of paper wrapped around the can, measured and divided into
regular gaps.Wrap a strip of paper around the can, and mark the point where it overlaps. Then fold the measured strip from the end to the mark. Folding in half another three times will leave you with sixteen folds; draw a line at each fold point. |
| |
37. Transfer the jet positions by reversing the template so that the marks are on the inside of the ring, and are reflected onto the can.Look down vertically onto the can and use a soft pencil or felt-tip pen to mark the drill points.Alternatively, you can do without any form of template and simply mark
the positions by eye; make a mark on opposite sides of the ring, dividing it in two. Then do the same to divide the ring into four, and then divide each quadrant again and again until you have sixteen marks. |
| |
38. Drill or prick the jet holes. There are many theories on the best position for the holes, but putting them in the middle of the sloping section is very easy, and minimises the chances of puncturing the inner or side walls.If you want to make a side-burning stove, where the pan sits directly on the burner and the jets appear from the side of the can, slide the template down the side of the burner to the height you want, and punch through the side wall of the burner. I’d also recommend making the burner a bit taller for this sort of stove, to allow room for fuel and a gap between the fuel and the jets. |
| |
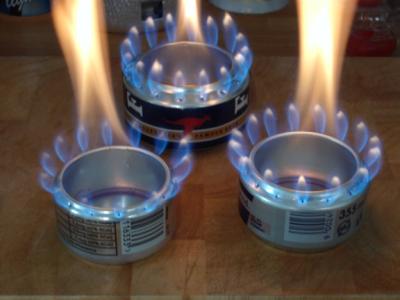
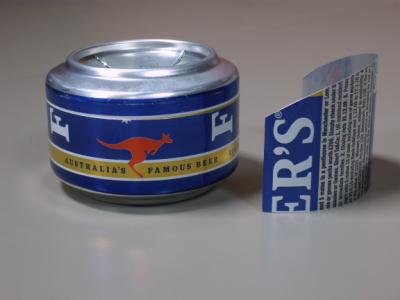
39. That’s it. Pour in a little meths and light up your burner.Here are three burners built using this technique; at the back, the one we’ve just made from 500ml beer cans, one on the left from 250ml ‘red bull’ cans, and one on the right from 355ml ‘big red bull’ cans.The central flame will tend to disappear when you put a pan over the burner, leaving just the jets. |